Rudi's Carb and Fuel Pump Teardown

Technical questions, advice, sharing information etc (aircraft, engines, instruments, weather and such)
User avatar
RudiGreyling
Top Gun
Top Gun
Posts: 695
Joined: Fri Jun 03, 2005 9:10 am
Location: The Coves
Contact:

Rudi's Carb and Fuel Pump Teardown

Postby RudiGreyling » Thu Jun 08, 2006 10:41 am

Hi Guys,

As you know I’m busy overhauling my 503, see my other thread about the engine teardown and inspection.

Below is my teardown of the carbs and fuel pump, some interesting finds after 435Hours of operation.

If you are going to do this go to this linkthat Morph provided and read everything about the process.

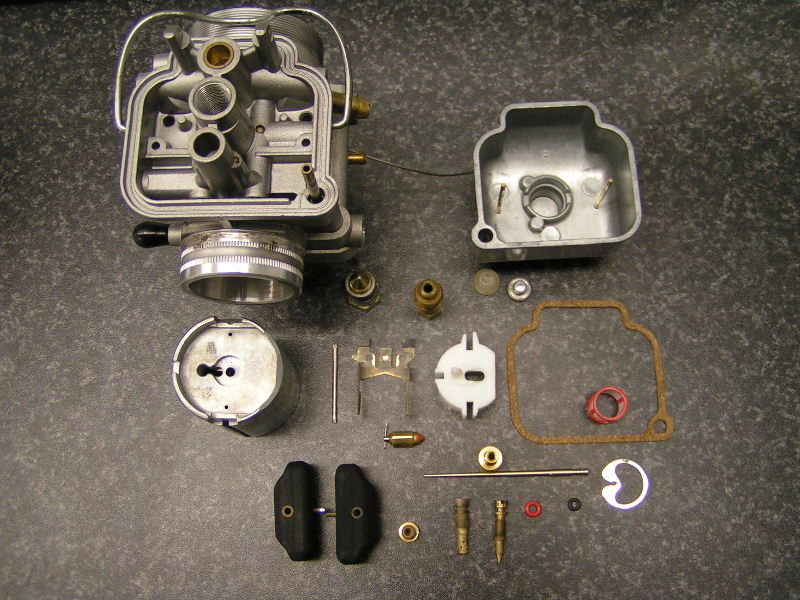
First strip the carbs into all its small portions, and clean it and blow out all the passages with compressed air. Here's all the parts.
Image

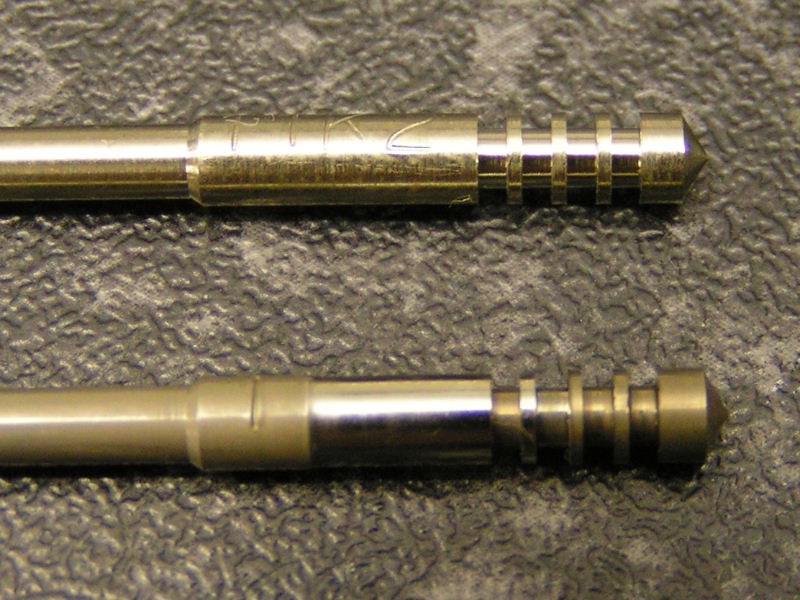
My carb must have been assembled before the Rotax service bulletin about the O-ring on top of the needle valve. I was shocked and surprised to see the amount of wear and tear on the old needle (bottom) compared to new (top). One can clearly see the wearing and there is a very definitive shoulder on the needle now, the 11K2 numbering is completely gone only the ‘1’ remain.
Image

With that amount of wear on the shoulder I can just imagine how much the needle and jet needle must be oversized now, since they slide into each other. If they are worn out it means too much fuel goes to the engine, leading to carboning up etc…

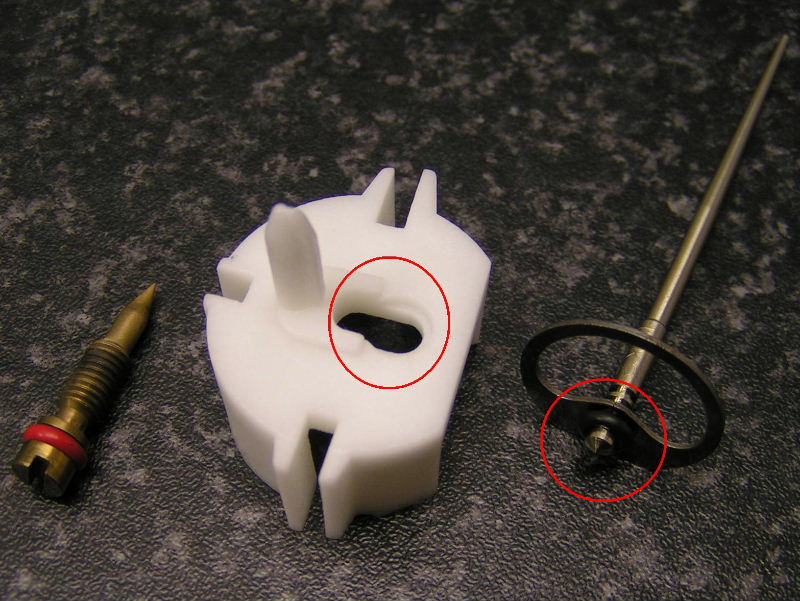
Rotax’s fix is a small O-ring on top of the needle, and a recess in the cap for the O-ring to fit in. This will ensure the needle is pressed down securely and it will not rotate that much and eliminate the excessive wear. Don’t confuse the red airjet O-ring shown left with the needle jet O-ring.
Image

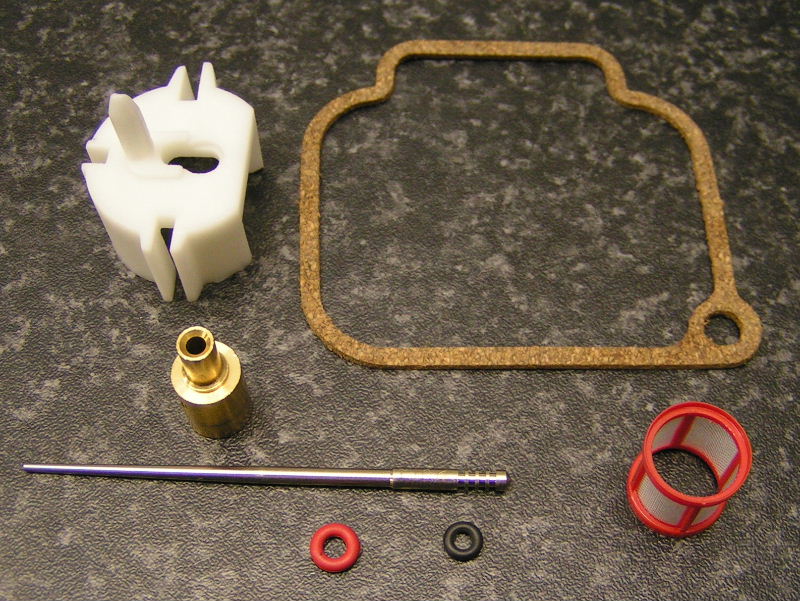
I purchased the following new parts, which typically wear out. (The big O ring for the carb top is not shown)
Image

I assembled everything back as per literature link above.

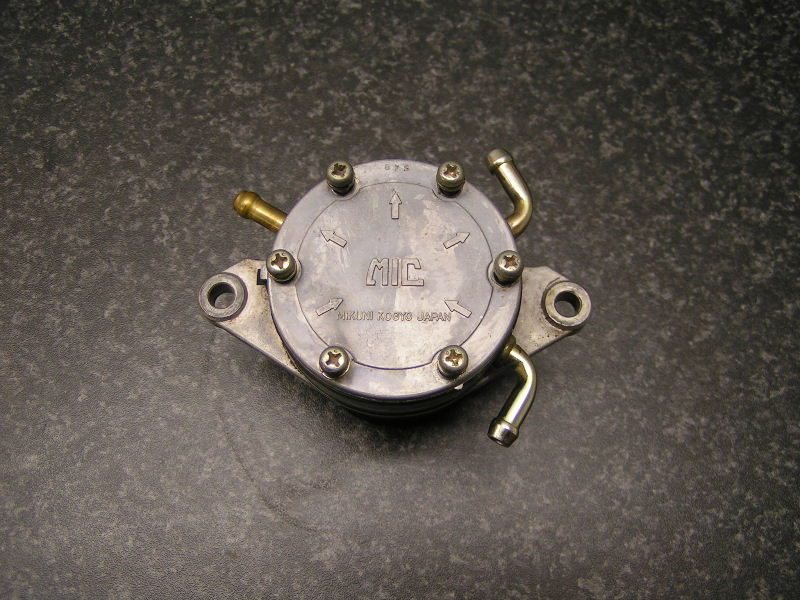
Next onto the Mikuni fuel pump, note the arrows shows the flow of fuel and the pulse port is on the bottom.
Image

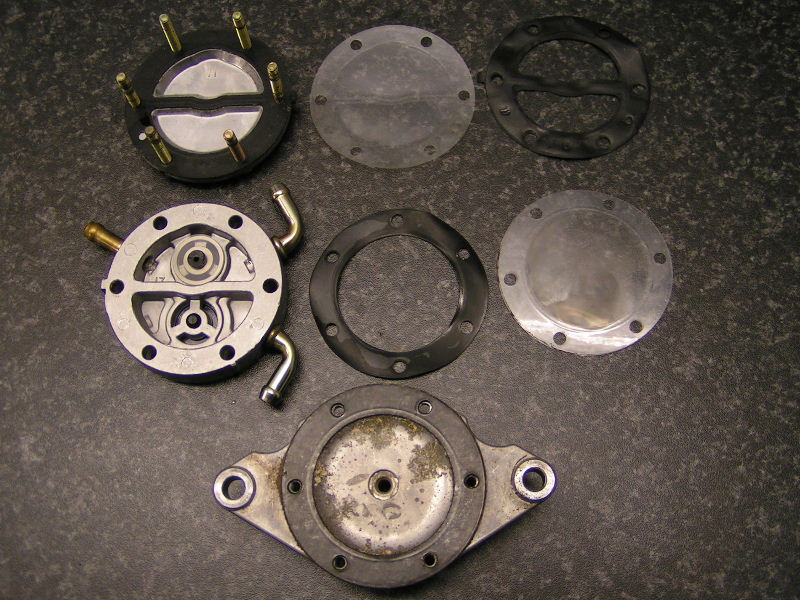
Here is the pump stripped and the pieces put in order from the top to right bottom. You can see it is a very simple pump, with no metal parts to wear out. Some of the membranes were a little warped.
Image

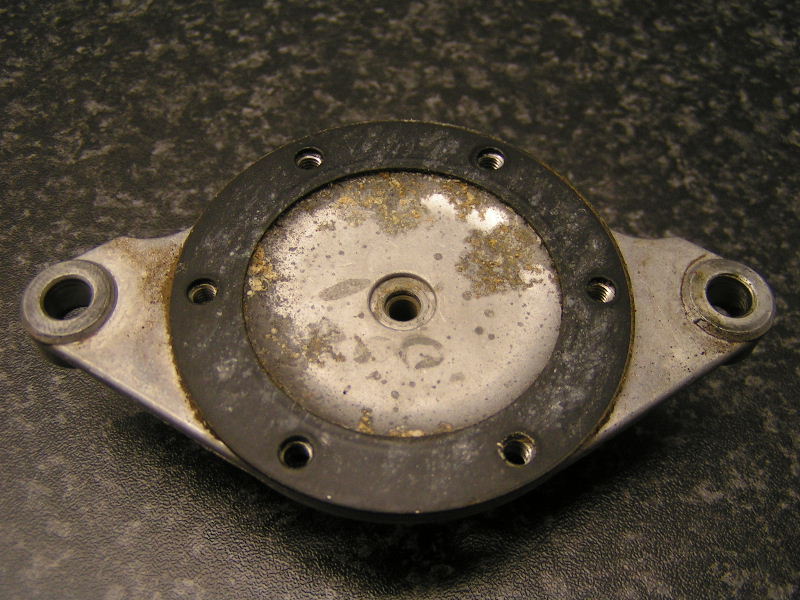
The inside bottom of the pump (pulse portion) was very dirty with a lot of gunk accumulated and corrosion. I was surprised to see this amount of gunk. Granted it is only air from the crank case via the pulse port in that bottom chamber, but still it looks bad. I cleaned everything and ensure the little 1/64 hole on the bottom of the pump in the pulse port 90 elbow is open.
Image

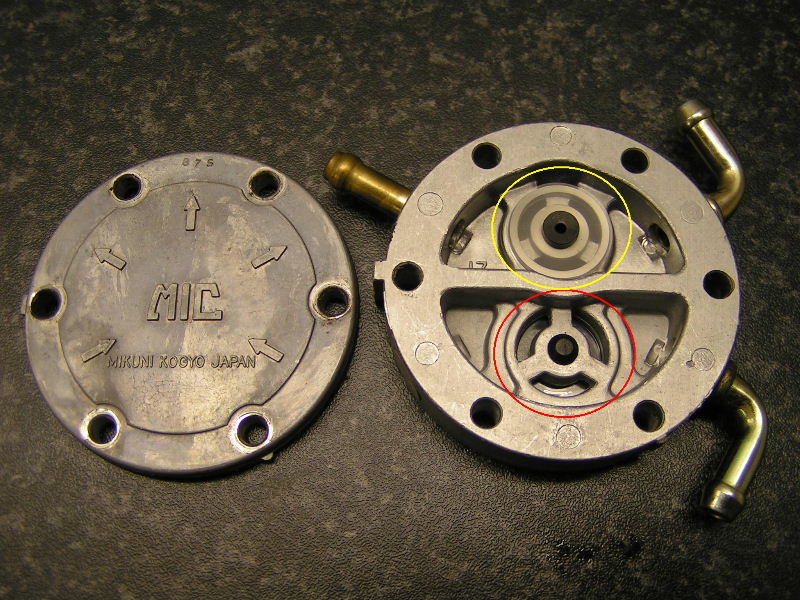
For interest sake here is brief explanation how simple these pumps work:
Image
Notice the arrows on the top cover. The pulse port on the bottom moves the membrane on the bottom back and forth. Fuel enters the pump on the bottom right, and gets sucked by the pulsing membrane through the one way valve (Red Circle) into the bottom chamber underneath the pump. The pulsing membrane then forces the fuel through the one way valve (Yellow Circle) back to top chamber. The top chamber then transfers the fuel under pressure through the 2 outlets to the carbs.

Anycase I purchased new membranes, gaskets and cleaned everything. Guess what Rotax do not sell the small transfer valve membrane parts. That is so stupid! The fuel pump can be as good as new if you replace all the membranes, since there are no metal parts that wear out. A new pump is almost 4 times the price of the gaskets +/- R1000! Anybody knows where I can find the membrane and parts for the transfer valves only, please post below.

The verdict, guys overhaul your carbs and fuel pumps when it is time. You might be surprised what you find. I was after 435 hours. One regularly hear people say: “These 503 motors are bullet proof, they can easily do 1000 hours or more”. Rotax say 300 hours or 5 years TBO, though the 300 hours might be conservative I personally think a 1000 hours is stretching it. Granted my engine is 7 years old, but I’m sure glad I did not blindly believe those comments.I guess ignorance is bliss?

I hope you guys have found this info useful.

Regards
Rudi
Last edited by RudiGreyling on Wed Nov 07, 2007 8:54 am, edited 2 times in total.
"Science, freedom, beauty, adventure - Aviation offers it all"
http://www.RudiGreyling.com
Slow_Poke

Postby Slow_Poke » Thu Jun 22, 2006 11:02 am

rudi, need some advise on seting up / tuning the carbs please, it seems that my engine is running rich in the cylinder although the cht & egt indicates otherwise?
User avatar
Duck Rogers
Toooooo Thousand
Toooooo Thousand
Posts: 2318
Joined: Tue Nov 29, 2005 9:49 pm
Location: West Rand

Postby Duck Rogers » Thu Jun 22, 2006 7:54 pm

stephan wrote:.....need some advise on seting up / tuning the carbs please, it seems that my engine is running rich in the cylinder although the cht & egt indicates otherwise?
Stephan, what exactly do you mean and what are the symptoms and/or what are you experiencing?

Duck Rogers
Airspeed, altitude, or brains....you always need at least two
User avatar
Cloud Warrior
Top Gun
Top Gun
Posts: 558
Joined: Sat May 28, 2005 9:49 am
Location: Perth, Western Australia

Postby Cloud Warrior » Fri Jun 23, 2006 7:27 am

I can buy a new pump for about R250 here in Oz. Overhaul kit is about half that - BUT - they do not recommend use thereof.

Somebody is making a killing!
User avatar
Morph
The Big Four K
The Big Four K
Posts: 5176
Joined: Wed May 25, 2005 3:34 pm
Location: Cape Town

Postby Morph » Fri Jun 23, 2006 9:30 am

stephan wrote:rudi, need some advise on seting up / tuning the carbs please, it seems that my engine is running rich in the cylinder although the cht & egt indicates otherwise?
Stephan, I emailed you some docs
Greg Perkins
User avatar
RudiGreyling
Top Gun
Top Gun
Posts: 695
Joined: Fri Jun 03, 2005 9:10 am
Location: The Coves
Contact:

Postby RudiGreyling » Mon Jun 26, 2006 12:02 pm

Hi Stephan,

sorry I was out of action for a week. Did you come right?

Rudi
"Science, freedom, beauty, adventure - Aviation offers it all"
http://www.RudiGreyling.com
User avatar
RudiGreyling
Top Gun
Top Gun
Posts: 695
Joined: Fri Jun 03, 2005 9:10 am
Location: The Coves
Contact:

Postby RudiGreyling » Mon Jan 15, 2007 2:56 pm

Just fixed the pictures.
"Science, freedom, beauty, adventure - Aviation offers it all"
http://www.RudiGreyling.com
User avatar
RudiGreyling
Top Gun
Top Gun
Posts: 695
Joined: Fri Jun 03, 2005 9:10 am
Location: The Coves
Contact:

Postby RudiGreyling » Wed Nov 07, 2007 10:14 am

Bump...just to ensure it does not get lost in the old post archives.
"Science, freedom, beauty, adventure - Aviation offers it all"
http://www.RudiGreyling.com
nickjaxe
Look I'm flying
Look I'm flying
Posts: 221
Joined: Wed Oct 05, 2005 9:42 pm
Location: North Cheshire in the UK.

Postby nickjaxe » Sat Nov 10, 2007 10:14 pm

I fly in the UK 503sc on a trike, I flew to 5500ft a few weeks back to cross some mountains and at that alt noticed my engine showing signs of running rich, ie would not hold steady revs, after desending it was fine any of you guys have any probs flying higher with a 503.

Nick.
What a nice feeling it is being part of such a nice group of people, {Microlighters}
bosbok
Solo cross country
Solo cross country
Posts: 135
Joined: Sat Jun 16, 2007 10:49 pm
Location: RSA

Postby bosbok » Sat Nov 24, 2007 10:15 am

Rudi,
I found this thread extremely helpful and very thorough.Thank you !!With your meticulous and pre-emptive maintenance approach to aviation you are an example to others.
Wishing you many safe and enjoyable flying hours.
Bosbok.
User avatar
falconp1
Top Gun
Top Gun
Posts: 647
Joined: Thu Oct 15, 2009 7:28 pm
Location: Klipriver airfield

Re: Rudi's Carb and Fuel Pump Teardown

Postby falconp1 » Sun Mar 01, 2020 9:43 am

Just to refresh this post by Rudi
ZS-WVD CONDOR
ZU-CIW Challenger 11
freddievanrooyen@yahoo.com

Who is online

Users browsing this forum: No registered users and 89 guests